|
|
|
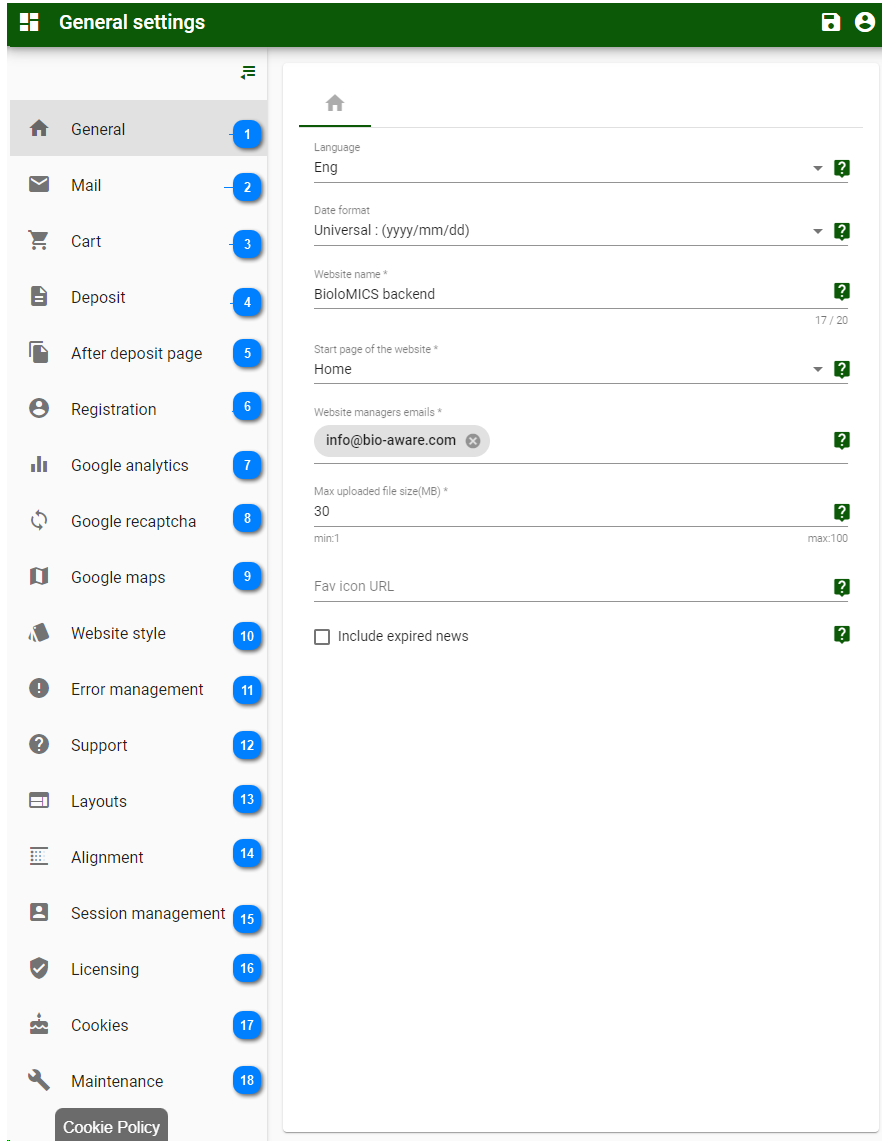
Manage the general settings of the website like the cart and registration settings for example.
-
In the Admin Panel section, click on the tile General settings. 
-
Select any of the categories on the left to see the detailed settings.
All information for this page can be found above this line. Simply hover the mouse on top of any of the numbers to see the information. Top
|
-
Language: The language to be used for the website.
-
Date format: Select from Europe (dd/mm/yyy), US (mm/dd/yyy) or Universal (yyyy/mm/dd).
-
Website name: Name for the website which will be visible to all internet users.
-
Start page of the website: Select from the dropdown list the page to be used when opening the website.
-
Website managers emails: The email addresses of the administrators of the website. They will receive notifications for changes made in the database and new registrations.
-
Max uploaded file size (MB): The maximum file size allowed to be uploaded to the website.
-
Fav icon URL: Enter the path/URL where the fav icon is stored. Note that the icon should in uploaded in the Files section first.
-
Include expired news: Check if all news items should be shown regardless the expiry date.
| |
|
-
SMTP host url: SMTP host used to send emails.
-
Email display name: Default email shown to the users.
-
Email address: The email address to be used to send the email.
-
SMTP port number: SMTP port, by default 2525.
-
Use SSL: Check if SSL should be used to send emails.
-
Account login: SMTP client login.
-
Use OAuth 2.0: If you cannot logn your account by normal user authentication, enable OAusth 2 then provide your client credentials, these credentials are saved but cound not be obtained.
| |
|
Information about the Cart, see Cart for more details.
| |
|
Report tab: 
-
Report title: Title used in the deposit report.
-
Report header: Header used in the deposit report.
-
Report footer: Footer used in the deposit report.
Mail tab: 
-
Mail subject: The subject of the email that will be sent to the website database managers and the customer.
-
Mail body: The content of the email that will be sent t the website database managers and the custormers.
Keywords: {{FirstName}} to get the user's first name, {{LastName}} to get the user's last name
| |
|
-
After deposit page Select, in the list, the page that should be displayed after a deposit is done.
| |
|
Registration tab: 
Information about the Registration, see Registration for more details.
| |
|
-
Enable Google Analytics If checked, it activates the google analytics module in the website.
-
Google analytics key Insert the Google analytics key.
| |
|
-
Enable google recaptcha Check this option to activate the google recaptcha.
-
Enter the Client key and the Secret key.
| |
|
-
Enable google maps Check this option to activate the google maps.
-
Api key Enter the google maps api key.
| |
|
-
Website width: The width of the website, insert a numeric value. By default it is set to 100.
-
Menu width: The width of the main menu, insert a numeric value. By default it is set to 100.
-
Width unit: The unit that is used to manage the width of the menu and the website. Either pixels or percentage.
| |
|
-
Http errors: The user friendly list of labels for http errors. Status, 404 error title, 404 error description.
-
Error title: The user friendly error title to be shown when an error occurs.
-
Error description: The user friendly error description to be shown when an error occurs.
-
Enable debug: If checked, the error page will show the technical information about the unexpected error instead of the above specified user friendly labels. This is not recommended.
-
Enable auto report: If checked, the auto report system will be enabled to send unexpected errors to the technical team. Recommended.
| |
|
Support tab: 
-
This section is to manage support categories and define the administrators to receive emails by category. It is also possible to create sub categories.
-
Click on the plus icon  to add a new category. Enter the name, email and sub categories. to add a new category. Enter the name, email and sub categories.
-
Click on the pencil icon  to edit the category. Update name, email or sub categories. to edit the category. Update name, email or sub categories.
-
Click on the bin icon  to delete the category. to delete the category.
Mail tab: 
-
Comment Enter the mail subject and body for the comment, that will be sent to the customer and the sales manager.
-
Ticket Enter the mail subject and body for the ticket, that will be sent to the customer and the sales manager.
-
Solution Enter the mail subject and body for the solution, that will be sent to the customer and the sales manager.
| |
|
-
Account layout: Select the best layout for the account page.
-
Cart layout: Select the best layout for the cart page.
-
Contact layout: Select the best layout for the contact page.
-
Details layout: Select the best layout for the details page.
-
Forum layout: Select the best layout for the forum page.
-
News layout: Select the best layout for the news page.
-
Profile layout: Select the best layout for the user profile page.
-
Support layout: Select the best layout for the support page.
-
Login layout: Select the best layout for the login page.
-
Error layout: Select the best layout for the error page.
-
Search layout: Select the best layout for the search page.
| |
|
-
Alignment database path: Path to directory where alignment database files are located.
| |
|
-
Session timeout: Time in minutes for the session to last before it expires.
-
Session countdown: Time in minutes for a countdown before a session times out.
| |
|
-
-
-
-
Synchronize licenses Use the sync button to synchronize users with licenses provided by the licensing api.
| |
|
-
Show cookies usage alert message If checked, provide the message/text.
-
Enable declining cookies usage
-
Disable google analytics when declining cookies usage
| |
|
Recycle Use the Recycle button to recycle your website, which will cause clearing cache memory to ensure you get the latest database changes.
| |
|
|
|
|