BioloMICS logo
×
BioloMICS menu

Table view settings


  • To open the table viewer, click on File to go to the background section, click on Table views settings.
     
     
    The window below will be opened.
     
    The List of table views displays all available table views for the current user in the current database.
  • Search for an existing table view (#1-3).
  • Add, duplicate or delete a table view (#4-6).
  • Modify the order of the table views in the list (#7-8).
  • Modify the owner and the rights of a table view.
     
    Acronym for new record (#10):
Enter the acronym for the name field of new records. For example, "BIO".
When a new record is added to the table, the name automatically starts with BIO + the next sequential number.
So when the last record was BIO 3, the next proposed name is: BIO 4.
 
The List of available fields displays all fields available for the current user in the current database.
  • Search for an existing field (#11-13).
     
    The Tree and Form settings displays the fields as they will be show in the tree in the main window of BioloMICS.
  • Add, rename or delete a group/folder (#16-18).
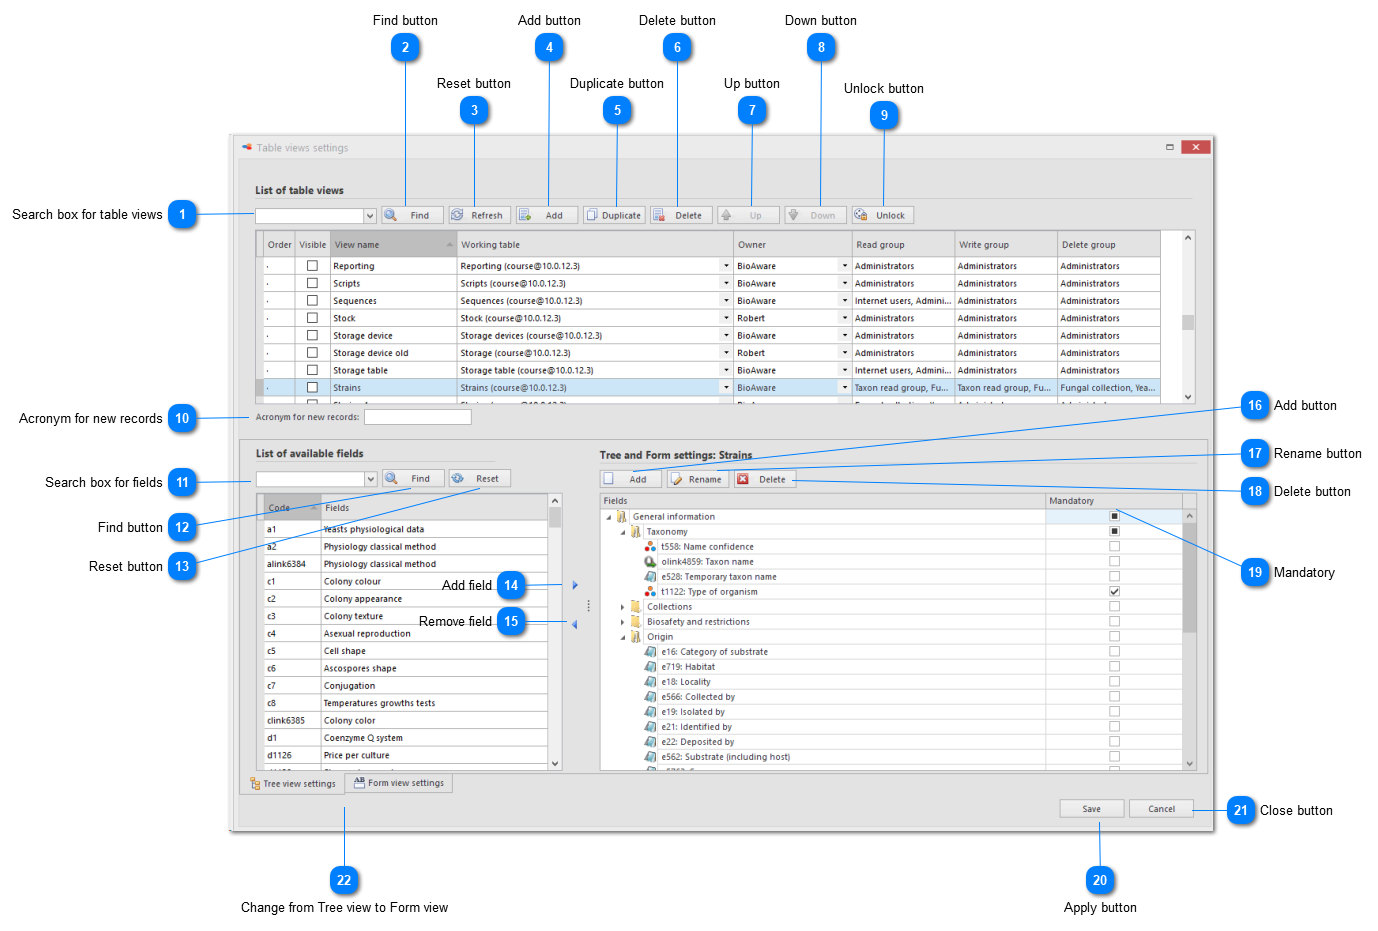
     
    Click on Tree view settings or Form view settings (#22) to switch between the tree and the form view.
     
Table view settings
1

Search box for table views

1. Search box for table views
Enter a (part of a) table view name to find it easily in the List of table views.
 
2

Find button

2. Find buttonSearch for the table views containing the text entered in the search box for table views.
 
3

Reset button

3. Reset button
Reset the List of table views to see all table views again.
 
4

Add button

4. Add button
Create a new table view. More more details, see Add new table view.
 
5

Duplicate button

5. Duplicate button
Duplicate an existing table view.
 
6

Delete button

6. Delete button
Delete selected table view.
 
7

Up button

7. Up button
Move the currently selected table view one place up.
 
8

Down button

8. Down button
Move the currently selected table view one place down.
 
9

Unlock button

9. Unlock button
A given table view can only be updated by 1 user at the time. As soon as someone is updating the table view, the next user will see that it is locked.
 
10

Acronym for new records

10. Acronym for new records
Start of the name for each new record added to this table. Acronym + the next sequential number.
 
11

Search box for fields

11. Search box for fields
Enter a (part of a) field name to find it easily in the List of available fields.
 
12

Find button

12. Find button
Search for the field containing the text entered in the search box for fields.
 
13

Reset button

13. Reset button
Reset the List of fields to see all fields again.
14

Add field

14.  Add fieldAdd a field to the current table view.
 
15

Remove field

15.  Remove field
Remove a list from the current table view.
 
16

Add button

16. Add button
Add a new group/folder to the current table view.
 
17

Rename button

17. Rename button
Rename selected group/folder.
 
18

Delete button

18. Delete button
Delete selected group/folder.
 
19

Mandatory

19. Mandatory
Mandatory fields will have to be filled when creating a new record. Only in the selected table view and only when checked in the Table settings.
 
20

Apply button

20. Apply button
Apply all changes made to the table views.
 
21

Close button

21. Close button
Close the window.
 
22

Change from Tree view to Form view

22. Change from Tree view to Form view
Click on Tree view settings to update the fields in the tree. Click on Form view settings to update the fields in the form.