History of changes (tracking system)
In BioloMICS, every change made at the table, field or record level is recorded and administrators and super-administrators can search for changes and undo them, if needed.
It's therefore always possible to track what was changed, when and by whom.
To be able to view, search and modify changes, one needs to belong to the administrators group.
-
There are two ways to open the history of changes:
-
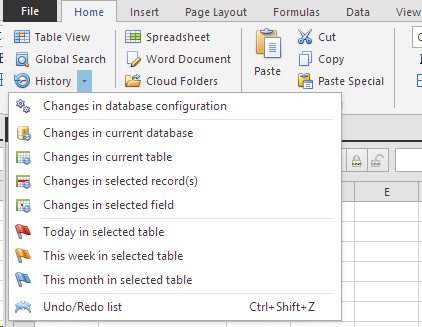
Under Home, in the Shortcuts group, click on the arrow on the button History and select one of the available options:

-
Changes in database configuration displays all changes made in the structure of the database, for example creation or modification of tables and fields.
-
Changes in current database displays all changes made in the current database.
-
Changes in current table displays by default only the changes made in the current table.
-
Changes in selected record(s) displays by default only the changes made in the selected record(s).
-
Changes in selected field displays by default only the changes made in the selected field.
-
Click on Today, This week or This month to find all changes made in this period of time.
-
-
Right-click on a given field in the tree in the main window of BioloMICS and select History of field 'field name' in record 'record name'.
-
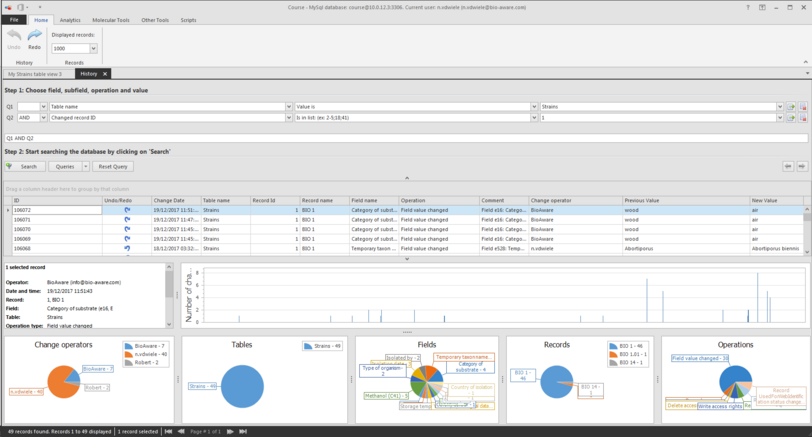
The history of changes window will be opened.
 The grid shows a list containing all details about the change that was made.This includes: date of change, user that changed the record, the field that was changed, the type of operation, previous and new values, etc.The chart with the bars shows the number of changes made over a period of time. Hover the mouse on top of a bar to see the data.On the left of the chart, a summary is shown based on the selected record in the upper grid.The pie charts at the bottom indicate the changes made per user, table, field, record and operation.
 -
-
To undo changes, select the row(s) having the undo icon
 in the second column in the grid and click on the Undo button
  in the ribbon.
 -
To redo changes, select the row(s) having the redo icon
 in the second column in the grid and click on the Redo button
  in the ribbon.
 -
To export the data from the History, click on the button Export to Excel.

This movie shows how to use the history of changes tool in BioloMICS.
1. Update data in database (0:09)
2. Undo/redo quick access toolbar (0:45)
3. Undo/redo list (1:01)
4. History of changes (2:16)
5. Search for given change (3:14)

